
This add-on will help you to add various surveys, polls, and quizzes to your forms or websites. It can be helpful for increasing the interaction of the users. You can also know what your website users would want in your forms and website through it.
Installation #
- Firstly, you need to purchase the Everest Forms Pro plugin.
- After the successful purchase, you will get the plugin zip file under your WPEverest account page.
- Now, you can download the Everest Forms Pro plugin and Everest Forms Survey, Polls & Quiz addon from there.
- Through your WordPress Dashboard, visit Plugins -> Add New -> Upload and then choose the downloaded zip file and then install and activate it.
- Now you are ready to use this add-on for your site.
Setup and Configuration #
Once you have completed the above tasks of installing and activating the plugin, we can move on to set up this addon for your website.
Go to the Everest Forms -> Add New from your Dashboard. Here, you can either add an entirely new form or modify a current one.
Select the one that will be most suitable for your website. Then, you can start adding the fields for your survey, polls or quiz.
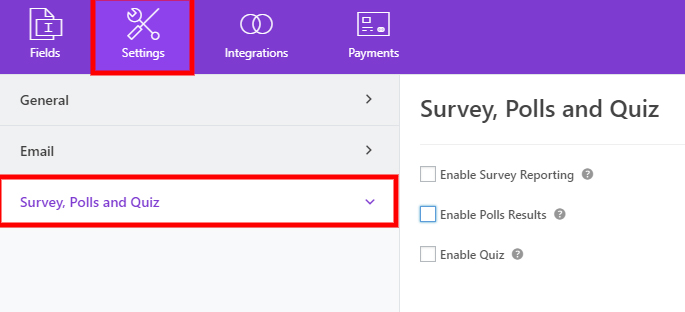
Enabling the Addon #
You can enable the survey, polls, or quiz addon by going to the Settings Tab on your new form. Here, you can enable the Survey Reporting, Polls Results, and Quiz for your website from the Survey, Polls, and Quiz section.
A Survey is a method of examining the records with various methods. With the help of this plugin addon, the questionnaire method will be used for your survey.
Polls are the records for opinions or votes. A single question of a survey can also be considered as a poll with the help of this plugin addon.
Quizzes are games or activities where the users attempt to answer the questions or problems correctly.
Enable the features that you want to add on your website out of these.
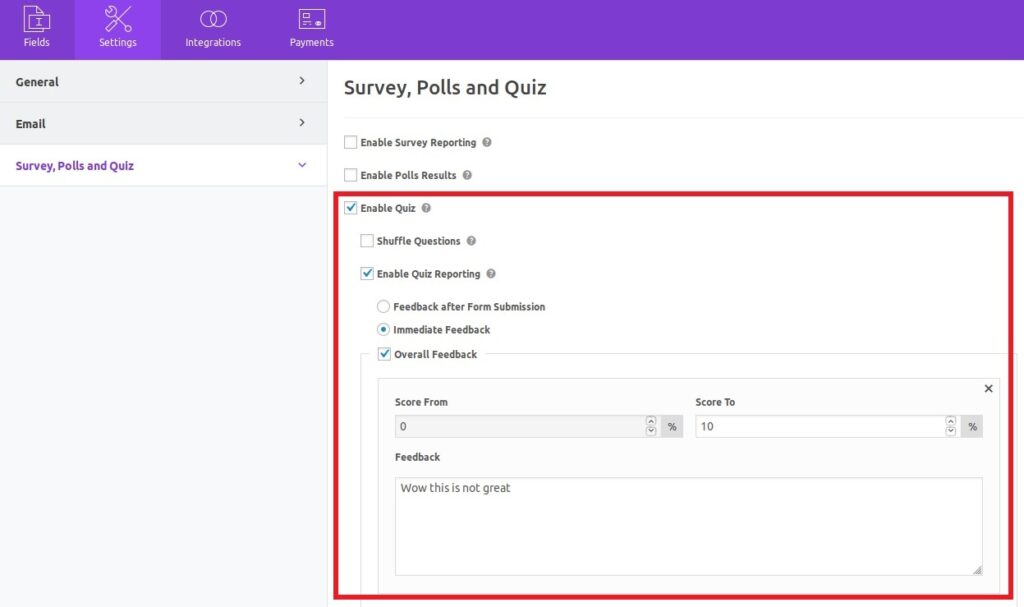
However, do keep in mind that you can’t enable both the survey reporting and quiz at the same time. One must be disabled in order to enable the other. But, the Polls Results can be displayed with both Survey Reporting as well as the Quiz.
While enabling the Quiz, you can also check the options to Shuffle the Questions and Enable Quiz Reporting.
Under Enable Quiz Reporting, you also get further more options to provide Feedback after Form Submission, Immediate Feedback, and Overall Feedback. All of them are available while reviewing the results.
Similarly, you can get expanded options to edit the feedback as well based on your score from the quiz in the Overall Feedback.
Selecting the Fields #
You can select different fields for the survey, polls or the quiz once you go to the Fields Tab. Each field is compatible differently with the Survey, Polls, or Quiz. They are mentioned as follows:
Survey #
We are introducing three new fields for the survey in Everest Forms Survey, Polls & Quiz addon. They are available in the Pro version only. They are:
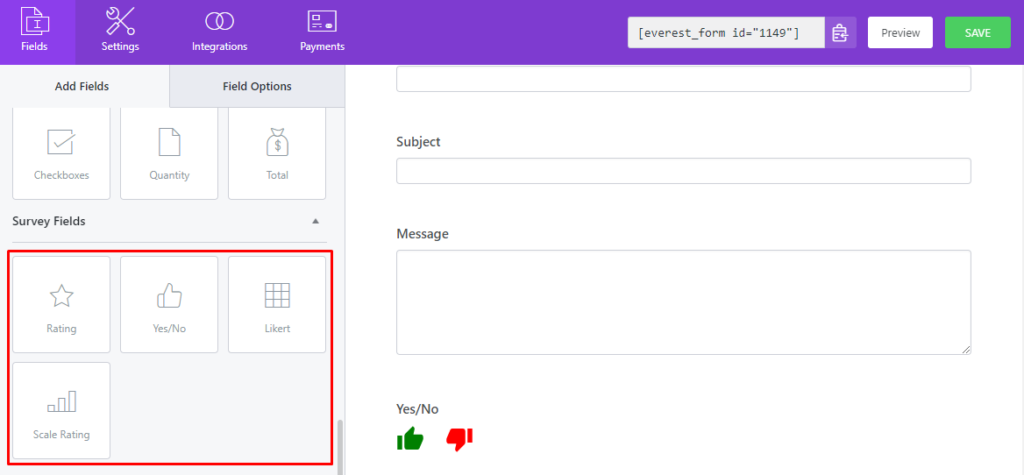
- Rating
The Rating field can be used to enable your users to provide the ratings for your survey. It is shown with star ratings up to 5 stars. With the help of it, you can know how satisfied your website users are with your website or survey. You have multiple options with it as well. You can change the label, meta key, description, and number of icons. The maximum number of icons that you can display is 100. Similarly, you can also change the rating icon, icon color, and CSS classes. In addition to this, there are options for enabling conditional logic and surveys for your website. - Likert
Likert is can be used for multiple-choice questions for your survey. You can edit the label, meta key, input type, number of rows and columns, and description for your survey. You also get the settings to edit the hide label checkbox, CSS classes, enable survey, and enable conditional logic for your website.
- Scale Rating
As the name suggests, the Scale Rating can be helpful to let your website users rate the survey questions with the help of a scale. You can update the scale from 0 to 100. The label, meta key, highest and lowest rating texts, and description can also be edited to the Scale Rating. You also get the settings to edit the hide label checkbox, CSS classes, enable survey, and enable conditional logic for your website.
- Yes/No
You can add yes or no questions on your survey form and with the help of this field, you can allow users to click on the thumbs up or down icon for yes or no respectively. Also, on the Advanced Settings of this field, you can change the color of the yes or no icons as well.
The other default fields that you can use for your website survey are Checkboxes, Multiple Choices, Dropdown, Single Line Text, and Paragraph Text.
Polls #
The default fields that you can use for your website polls are Checkboxes, Multiple Choices, and Dropdown.
Quiz #
The default fields that you can use for your website quiz are Checkboxes, Multiple Choices, and Dropdown.
Using the Fields #
You can easily add the fields by using Drag and Drop. Just drag the required field on the desired rows or column from the left side of the screen to the right side of the screen.
The Survey or the Quiz is automatically enabled in the field options when you enable them in the Settings Tab. They can also be disabled if you want.
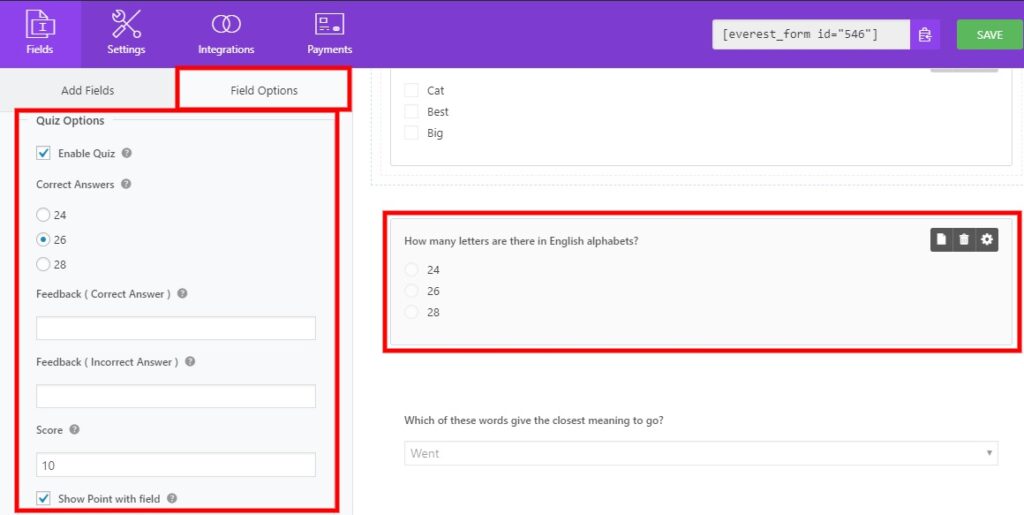
Additionally, the fields used for the Quiz also has extended options for Correct Answers, Feedbacks of both Correct as well as Incorrect answers, Scores, and Show Point with Fields. The scores of the questions can also be displayed at the end of it.
Once you finalize all your fields, click on Save. You will then be able to see your survey, polls, or quiz on your website now.
However, do keep in mind that these fields will work for your website for a survey, polls or quiz only if you have purchased the Everest Forms Pro version and the Everest Form Survey, Polls, & Quiz addon.
Reviewing the Results #
Once your users fill out the survey, polls or the quiz, you can view the results on your dashboard as well. To view them, go to Everest Forms -> Entries. Or, go to Everest Forms -> All Forms. Then click on the Entries of your survey, polls, or the quiz.

You can view all the detailed stats of the results entered by your users in the Everest Forms Survey, Polls, and Quiz addon. There are different ways through which they are displayed for each Survey, Polls, and Quiz.
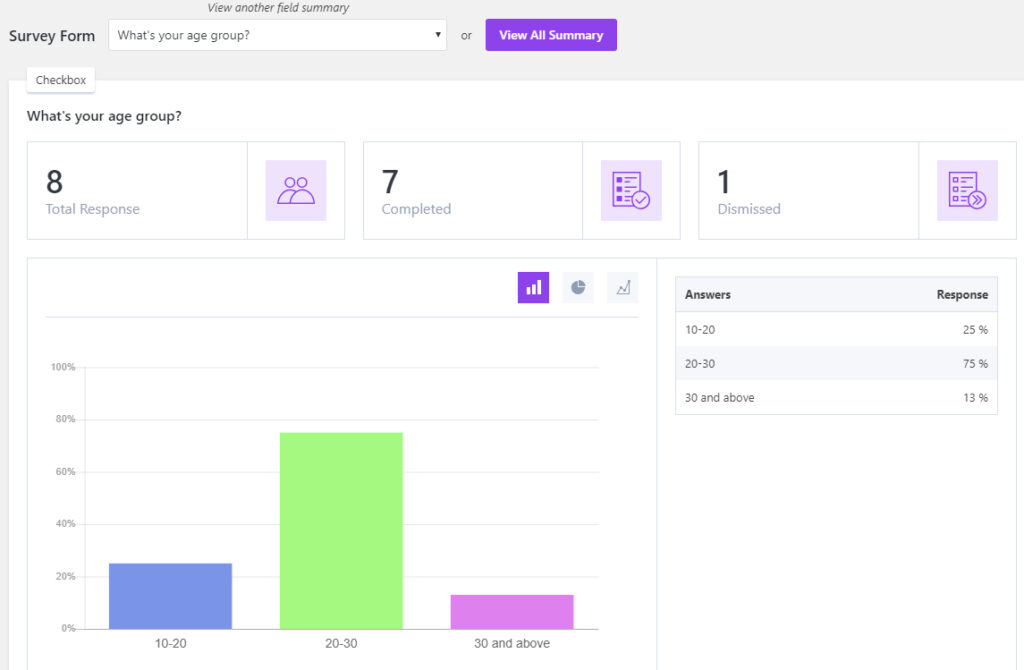
Survey: #
The Survey has a lot of details that can be viewed on your dashboard. Just select the survey of which you want to view the results from the Entries on your Dashboard. Here, you can see the number of users who have Responded, Completed, and Dismissed the survey. This can be displayed in all the fields. There are also bar charts, pie charts, and line charts for the survey fields like checkbox, multiple choices or radio, dropdowns or select, ratings, and scale ratings. Their summaries in percentage are also displayed at the right side of the screen.
For the remaining fields of the Survey like the likert, single line text, and the paragraph line text, only the results are displayed.
You can also view all summaries of the survey at once if you want by clicking on View All Summary.

Polls: #
Since a single question of the survey can be regarded as a poll, the results shown for the polls are quite similar to the survey. Only the fields compatible with the Polls are shown in the results of the Entries. So, do make sure that you have enabled the Poll Results checkbox in the Settings and Enable Survey checkbox in the Field Options.
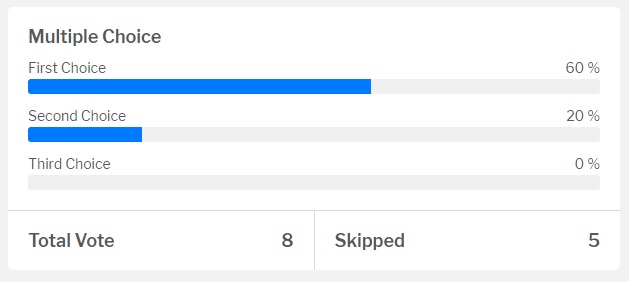
The results of the poll can be viewed on either the dashboard of the website or at frontend on the website. The results of it on the Dashboard is displayed similarly with the survey with the help of various charts and other required information. It also shows the Total Votes and number of votes Skipped.
Quiz: #
The results of the quiz can also be viewed on the Entries Tab. You do need to remember that when you click on the Entries Tab, the last entries that you selected will be opened at the first. You need to click on the View All Summary and select the summaries for the quiz in order to display the quiz results on your dashboard.
You can always go to Entries directly from All Forms on your Dashboard if you find the process very tedious.
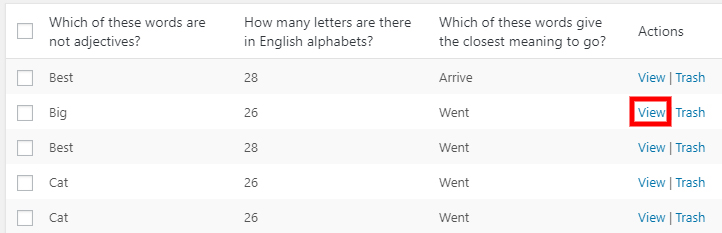
Now, you can view each of the answers and their scores by clicking on View of the respective user in the Action column.
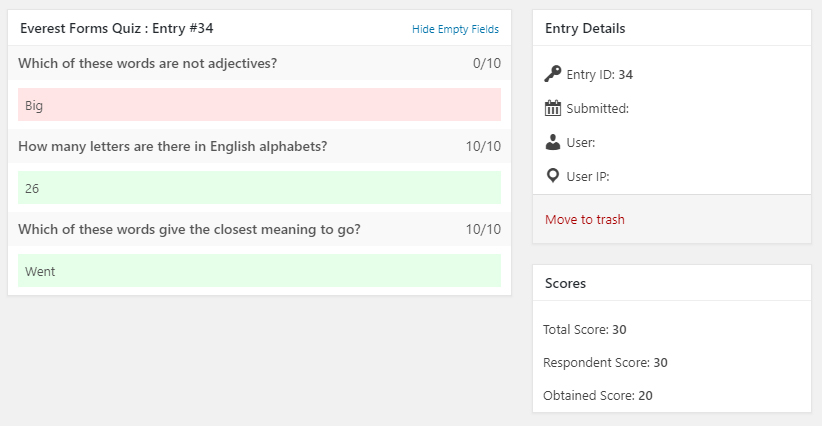
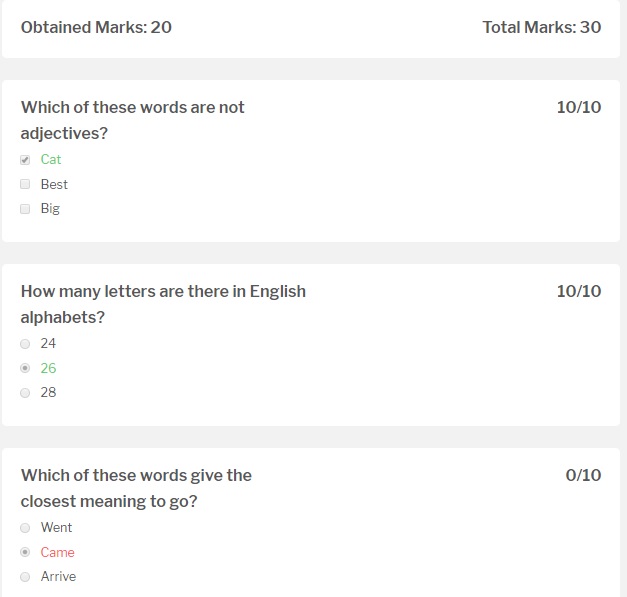
When you view them, the number of correct and incorrect answers along with their total scores can be seen. The Entry ID, Submitted Date, User name, and User IP are also displayed here.
The results can also be shown on the screen of the user as well in the frontend. The Total Marks and Marks Obtained are also shown along with the report of the answers entered by the users.
The options that you choose on the Settings while enabling the addon can also play a huge role in displaying the results.
If you submit the Immediate feedback option, the feedback will appear right after you click on your answer.
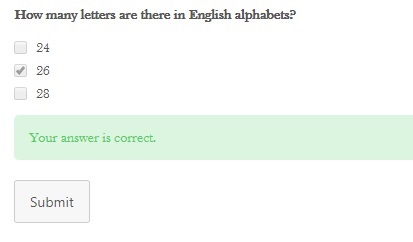
There are two separate options with which you can show the feedback. If you select the Feedback after form submission, the feedback will appear only after you submit the form.
The Overall Feedback can be displayed on the immediate feedback as well as feedback after submission.
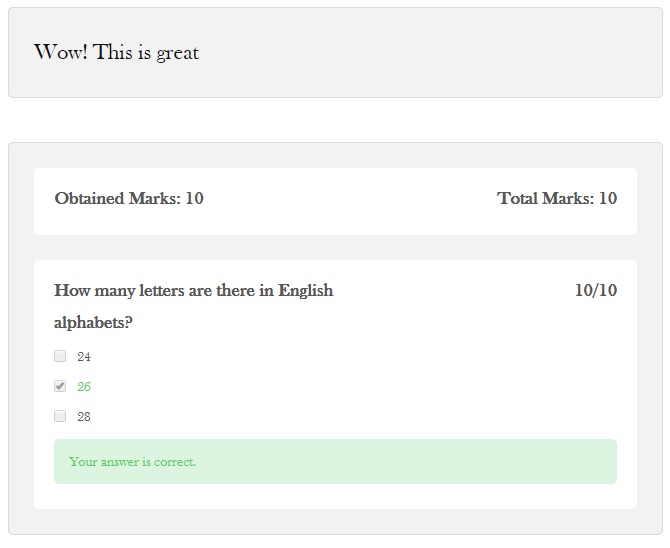
Note: You can easily add the feedback based on the performance of the user from the quiz. The overall feedback can be varied from the percentage of the score that the user obtains while taking the quiz. Just appoint the percentage of the score and add the feedback accordingly.


